Operating Manual of Pool Control
Table of Contents
General 2
Instruction of Use.. ………………………………………………………………………………….2
Main Circuit Board.. ………………………………………………………………………………….2
LED
Displays. ………………………………………………………………………………….3
Operation
Pilot Lamps. ……………………………………………………………………….3
Set
Mode. ………………………………………………………………………………….4
Changing
the Values. ………………………………………………………………………………….4
Set
Up Local Time. ………………………………………………………………………………….4
Set
Up Timer 1. ………………………………………………………………………………….5
Set
Up Timer 2 and Timer 3. ………………………………………………………………….6
Topside
Control Box. ………………………………………………………………………………….7
LED
Display. ………………………………………………………………………………….7
Jet/Booster
Pump...................................................................................................... 7
Air
Blower. ………………………………………………………………………………….7
Filter
Pump. ………………………………………………………………………………….7
Heater. ………………………………………………………………………………….7
Underwater
Light. ………………………………………………………………………7
Troubleshooting.. ………………………………………………………………………………….8

http://www.winspa.cn
subject to change without
prior notice
General
l
Read this manual carefully before
use.
l
Electrical connection must be carried
by a licensed qualified electrician only.
l
Ensure that the power supply is
compatible with the equipments to be installed.
l
IMPORTANT! Make sure that the equipments
are under protection of a circuit breaker.
l
WinSpa spa control system can be
installed either fixed to the edge of spa pool or with equipment pack, at
location for easy access and maintenance.
l
Temperature sensor must be
through pipe after heater to spa pool.
l
Use separate line conduit for
control signal wires to avoid interference.
Instruction of Use
1.
This unit is designed to filter and
keep the pool in desired temperature for domestic and/or commercial use. It is
designed to control 2 jet/booster pumps, 1 air blower, 1 heater or chiller, 1
underwater light,1 filter pump and chlorinator.
2.
One circuit board can be maximum connected
with 2 control boxes and 6 air switches, that can be installed along the pool
edges and that offer more convenience for the user.
3.
No default settings have been set
in this unit, make sure to get your own settings done before operation.
4.
NOTE!
For commercial use and energy
saving, the session time is limited to 15 minutes. For longer water fun time,
press the keys again to switch on the jet pumps and blower.
5.
Memory function for all settings.
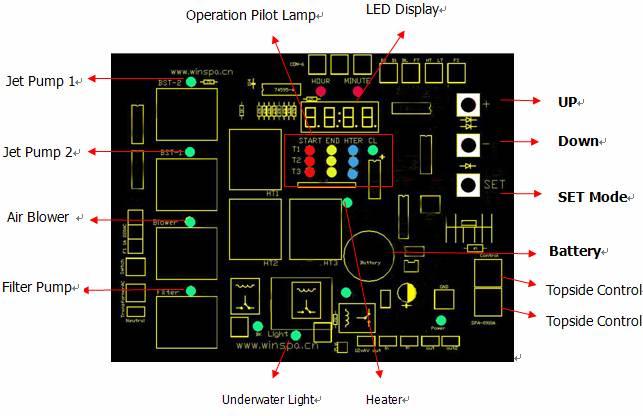
Main Circuit Board (Fig. 1)
LCD Displays
LCD displays on both main circuit
board and topside control displays current time and water temperature
alternatively. Time shows 00:00, and temperature shows --:00.
Operation Pilot Lamps (Fig.2)
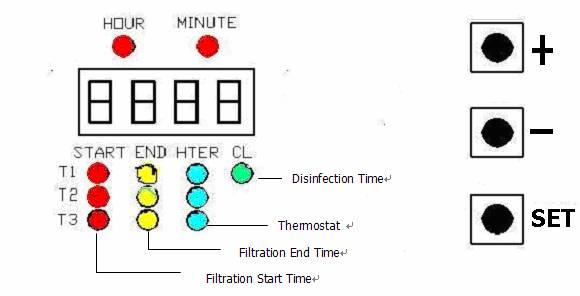
①
HOUR:
For the user to set the local hour time, see SET LOCAL TIME.
②
MINUTE:For
the user to set the local hour time, see SET LOCAL TIME.
③
T1、T2、T3: Three different
Filtration time periods.
Timer 1(=T1) ,Timer 2 (=T2),Timer
3(=T3)
④
START:Daily
Filtration Start time of Timer 1(=T1), Timer 2 (=T2) and Timer 3(=T3)
⑤
END:
Daily Filtration Daily time of Timer 1(=T1), Timer 2 (=T2) and Timer 3(=T3)
⑥
HTER:
Desired temperature in Daily
Filtration time periods of Timer 1(=T1), Timer 2 (=T2) and Timer 3 (=T3)
⑦
CL:Daily
Disinfection time
NOTE! When Filtration time of Timer 1 (=T1),
Timer 2 (=T2) or Timer 3(=T3) starts, the filter pump will be switched on
automatically and pilot lamps of both “START” and “END” on circuit board go on. Thermostat will be switched on too if water
temperature is preset and lamp of “HTER” goes on as well. When Filtration time
ends, equipments will be switched off automatically and pilot lamps go off.
Daily
Disinfection can be set in Timer 1 (=T1) only. IMPORTANT
To have your pool disinfected properly, it is important to preset the
Disinfection time in “CL” of T1.
 Set Mode
When SET button is pressed, the
display shows remaining time/setting correspondingly.
IMPOERTANT! Always press and hold SET button to enter setting
modes. When pilot lamp goes to position to be set, release SET button and press
up or down buttons to change current timing or setting.

 Changing the Values
Pressing Up or
Down button in control unit will in- or decrease the currently displayed value.
A value cannot be in- or decreased above or below its maximum or minimum value.
The up and down
buttons are repetitive. Holding the Up or Down button will cause the value to
in- or decrease with an increased rate.
If no keys are
pressed within 5 seconds, changes in the values are confirmed and exit setting
automatically, the
screen displays current time and temperature alternatively.
Press and hold
Up and Down button at the same time for 2 seconds to back to factory test
setting and the display shows 00:00.
◆ SET UP LOCAL TIME
Time clock is
in-built for all settings. It is important to let this control system know your
local time before any settings.
Press and hold
SET button till the pilot lamp on "HOUR" position as Figure A shows. Change the remaining hour by pressing Up or Down buttons. Each
press in- or decreases in 1 hour intervals. If there is no change to setting,
press SET button again, then the pilot lamp moves to "MINUTES"
position as Figure B shows. Release SET button and press Up or Down
button to change the remaining values.
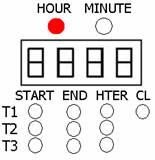
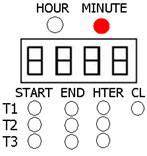
Figure A
Figure B
Warm Up and Filter the pool automatically
There are three different time periods in a day can be set for automatic
temperature control and filtration for the pool. For example, (1)set the water
temperature in T2 to 36℃ from 7:00am to
10:00am, the thermostat will be switched on automatically at 7:00am and
switched off at 10:00am and maintain the pool water in 36℃;
(2) set the water temperature in T3 to 39℃ from 18:00pm to
23:00pm, then t the thermostat will be switched on again automatically at
18:00pm and switched off at 23:00pm. If, (3) normal water temperature and daily
Disinfection are wanted from 12:00pm to 14:00pm, then set the “HTR” to zero (00C ) degree and set the Daily
Disinfection time (CL) in T1, both the filter pump and Aquacmatics or Chlorinator will
be switched on automatically at 12:00pm and switched off at 14:00pm, however
the thermostat will not work during this time period.
Water in pool may contain impurities and bacteria.
To prevent this and maintain a perfect clear water, it is recommended to have
the pool filtered / Disinfected daily. For pool in commercial use (over 5 hours
continuously daily) minimum one hour daily disinfection is recommended. To
perform preventative maintenance for your pool water, please follow below steps
to set your pool control system:
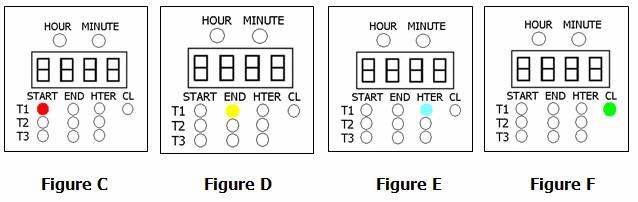
◆ SET UP TIMER
1 (=T1)
Step 1: Set Filtration Start
Time
Press and hold SET button till pilot lamp on "START"
of "T1" position as Figure C shows, release SET
button and press Up or Down buttons to change the remaining value. Each press
in- or decreases in 5 minutes intervals, or hold the Up or Down button till to
the desired time is displayed then release the button.
Step 2: Set Filtration End
Time
Press and hold SET button till pilot lamp on "END"
of "T1" position as Figure D shows, then repeat process as
StepⅠto set the end filter
time.
IMPORTANT! Setting will be invalid if start time = end time
Step 3: Set Water Temperature
Press and hold SET button till pilot lamp on "HTER"
of "T1" position as Figure E shows, then release
SET button and press up or down buttons directly to set / change temperature at desired level.
The temperature will be saved as default settings if there is no buttons are
pressed within 5 seconds and exit setting modes.
The
factory default set temperature is 00C.
It can be adjusted from 0℃~40℃.
Step 4: Set Automatic Daily
Disinfection Time
Press and hold SET button till pilot
lamp on "CL" of "T1" position as Figure F
shows, release SET button and press up or down buttons directly to adjust disinfection time. It can be set and adjusted from 0~90 minutes.
◆ SET UP TIMER 2 and TIMER 3
Repeat above steps to set Timer 2 (=T2) and Timer 3 (=T3).
NOTE.
When
daily Filtration Start time comes, the filter pump and thermostat (if
temperature is preset) will be switched on automatically and pilot lamps on
circuit board of “Start”, “End” and “HTER” (if temperature is preset) go on
through whole filtration time period. When filtration time ends, equipments
will be shut off automatically and all pilot lamps go off too.
Daily disinfection starts when daily filtration of T1
starts. The Aquacmatics / Chlorinator will be switched on automatically and
work for a certain period as preset, from the time being switched on.
Topside Control Box (Fig. 3)
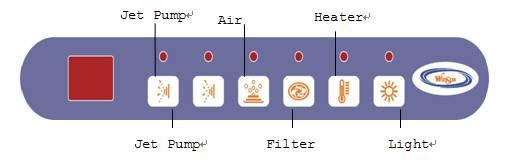
LED DISPLAY
The LED
Display shows time and temperature alternatively.
 JET/BOOSTER
PUMP
JET/BOOSTER
PUMP
Press  button on control
box to switch on/off the jet pumps.
button on control
box to switch on/off the jet pumps.
N.B. Each hydrotherapy session limits to 15 minutes for commercial use. To have a longer hydrotherapy
massage, press  button again, the
jet pump will be switched on again and you will have another 15 minutes
hydrotherapy session.
button again, the
jet pump will be switched on again and you will have another 15 minutes
hydrotherapy session.
 AIR BLOWER
Press  button on control
box to switch on/off the air blower.
button on control
box to switch on/off the air blower.
N.B. Session time limits to 15 minutes for commercial use. To have a longer
water fun time, press button again to
switch on the air blower again for another 15 minutes.
 FILTER PUMP
Press  button on control
box to switch on/off the filter pump (exclusive for commercial use).
button on control
box to switch on/off the filter pump (exclusive for commercial use).
 HEATER
Press  button on control
box to switch on/off the heater (exclusive for commercial use).
button on control
box to switch on/off the heater (exclusive for commercial use).
 UNDERWATER LIGHT
Press  button on control box to switch on/off
the underwater light.
button on control box to switch on/off
the underwater light.
IMPORTANT! Key lock function is adopted into
topside control for commercial use! For commercial use situation, both
filtration time and temperature settings are locked.
To start and/or end pool filtration
manually any time if needed, always press button
four times continuously first and then press button
once on topside control to switch on/off the filter pump;
To switch on/off thermostat
manually any time if needed, always press button
four times continuously first and then press button
once on topside control to switch on/off the heater. See
Fig. 3.
Troubleshooting
In the event the pool is not working the way it should,
please first review all the installation of your pool and the operating
instructions in this manual and check the message on the panel display.
 CAUTION!
WARNING! SHOCK HAZARD! No user serviceable parts. Do not attempt service of this control. Contact your
dealer or service organization for assistance. All maintenance and repairs must
be carried out by a licensed professional electrician.
CAUTION!
WARNING! SHOCK HAZARD! No user serviceable parts. Do not attempt service of this control. Contact your
dealer or service organization for assistance. All maintenance and repairs must
be carried out by a licensed professional electrician.
The display shows E1 and filtration does not operate.
Cause: There is no water flow in the pipe line. The filter
pump operates but shut off within 10 seconds when it is not properly primed.
This can happen after the spa is drained and refilled.
Solution: Press button several
times (for commercial use type, press  button
four times continuously first and then press button
once ), never leaving the motor on for
more than 5-10 seconds at a time.
button
four times continuously first and then press button
once ), never leaving the motor on for
more than 5-10 seconds at a time.
The
display shows time and  alternatively
Cause: The connection wire of thermostat sensor is loose,
or the sensor itself is defective.
Solution: Check the joint connection of wire. If well connected, replace a sensor.
If no problem can be found, contact the dealer.

http://www.winspa.cn
subject
to change without prior notice


